Introduction
I spent a few weeks (and could have spent even more) trying to find a reliable trick to intercept kernel activity while HVCI was breathing down my neck. Almost every approach I tried ended the same way: either a blunt “access denied” or an instant black screen that replaced everyone’s favorite blue one.
Windows is not playing games anymore; the era of clever inline hooks and creative PatchGuard dodges is largely over. Microsoft pushed the enforcement layer up into places a normal kernel driver simply can’t touch. We’re talking hardware-enforced, hypervisor-backed protections: “you don’t even have permission to ask for permission.”
This research centers on a specific objective: hiding processes from user-mode enumeration by manipulating kernel structures – specifically, the process linked lists that Windows uses to track active processes. Why bother? Process hiding remains a cornerstone technique for rootkits, anti-cheat evasion, and security research. The ability to make a process invisible to Task Manager, system monitoring tools, and even some security products provides a powerful capability for persistence and stealth.
The catch is that modern Windows doesn’t just check these structures once – it continuously validates them through multiple layers. Traditional PatchGuard performs periodic integrity checks on critical kernel structures, but its responses vary: some violations trigger immediate bugchecks (instant blue screens), while others are queued for delayed, randomized responses that can occur minutes or even hours later. This unpredictability made early detection of violations nearly impossible during testing. Compounding this, Secure Kernel PatchGuard (SKPG) runs from VTL1 and monitors the normal kernel from a privileged hypervisor context, adding another watchdog that can’t be easily detected or interfered with from VTL0.
This research focuses on one narrow, repeatable problem: tampered LIST_ENTRY structures that can trigger a 0x139 KERNEL_SECURITY_CHECK_FAILURE during process termination. The goal was simple and constrained: find a viable bypass from within a kernel-mode driver running in VTL0. No bootkits, no pre-OS tricks, just pure in-kernel experimentation.
Fair warning: if you’re expecting a magic bullet that defeats all of Windows’ defenses, this isn’t it. What I present here is an explanation of one promising direction for a bypass and a catalog of other concepts that weren’t fully explored. It’s a snapshot of what’s possible (and what isn’t) when you try to operate inside the kernel while hypervisor-backed integrity is watching.
Part 1: Understanding the Enemy – HVCI & VTLs
Before attempting any kernel interception, we must understand Windows’ virtualization-based security architecture that makes traditional hooking impossible. This explanation builds upon detailed technical resources from Rayanfam’s hypervisor series and Connor McGarr’s HVCI deep-dive.
Traditional kernel security relied on software checks conducted by PatchGuard, but with the proper hooking methods or tricks it could have been disabled. Both PatchGuard’s protections and attacker techniques operated at the same privilege level – the kernel itself. This created a cat and mouse game where attackers could circumvent any protection as long as they discovered its implementation details: researchers would find new bypass techniques, and Microsoft would respond with more complex checks, improved anti-debugging measures, and increasingly complex code.
Hypervisor-protected Code Integrity (HVCI) fundamentally changes the rules of the game. Instead of software wars (software protection vs. software attacks), Microsoft moved the entire protection mechanism to a different operating system running alongside the normal Windows OS. This parallel operating system is isolated from the regular kernel, where only cryptographically signed and trusted binaries can be executed.
But HVCI doesn’t work alone. It’s part of a broader defense ecosystem:
PatchGuard (Kernel Patch Protection) – The original defender, still present in VTL0 (regular Windows). PatchGuard performs runtime integrity checks on kernel structures. While it can be bypassed with kernel access, it serves as the first line of defense and forces attackers to be more sophisticated.
HVCI (Hypervisor-protected Code Integrity) – The hardware enforcer. HVCI uses Extended Page Tables (EPT) to make all kernel code pages read-execute only (R-X) on hypervisor level. Even if bypasses PatchGuard’s check and modifies page table entries to mark pages as writable, EPT will still block the write operation. This isn’t a software check you can bypass.
HyperGuard (Secure Kernel PatchGuard/SKPG) – The hypervisor’s watchdog, running in VTL1. HyperGuard constantly monitors critical hypervisor and VTL1 structures for tampering. It checks hypervisor integrity, EPT structures, VMCS (Virtual Machine Control Structure), VTL1 memory regions, the Secure Kernel (securekernel.exe) itself, VTL1’s critical data structures, function pointers, and security policy enforcement mechanisms. Think of it as a protector of a protector that ensures even if an attacker somehow reached VTL1, they couldn’t disable its security checks.
1.1 Virtual Trust Levels – The Foundation
Windows with enabled HVCI operates on a Multi-Layered Security model enforced by Microsoft Hyper-V. This isn’t just a basic security feature; it has completely restructured Windows’ operations on the most basic level. With HVCI enabled, the whole Windows installation runs as a virtual machine guest, even when it feels like it’s running directly on hardware.
The architecture utilizes Virtual Trust Levels (VTLs) to create isolation boundaries. You can think of these as security rings within security rings. Traditional x86 processors have protection rings (Ring 0 for kernel, Ring 3 for user mode). Systems with VTLs enabled add a new dimension: vertical isolation enforced by the hypervisor.
VTL Architecture: Two Worlds, One Machine
Think of VTLs as parallel universes running on the same hardware. VTL0 is the normal world where Windows lives, and VTL1 is the secure world that watches over it. They share the same physical CPU and memory, but the hypervisor ensures they can never directly “touch” each other.
A process in VTL0 cannot access or even see what’s happening in VTL1. The separation is absolute. A real-world example of this architecture is Credential Guard’s implementation of LSASS protection:
- VTL0: Regular lsass.exe runs here, handling authentication requests as usual
- VTL1: LsaIso.exe (LSA Isolated) runs here, storing the actual credentials (password hashes, Kerberos tickets)
- Communication: VTL0’s lsass.exe sends requests to VTL1’s LsaIso.exe through secure RPC channels validated by the hypervisor
Even if malware compromises the kernel and gains full Ring-0 access in VTL0, it cannot dump credentials from LsaIso because those credentials physically exist in VTL1’s isolated memory space. The hypervisor simply will not allow VTL0 to read VTL1’s memory.
Here’s what happens when you try to debug VTL1 processes from VTL0:

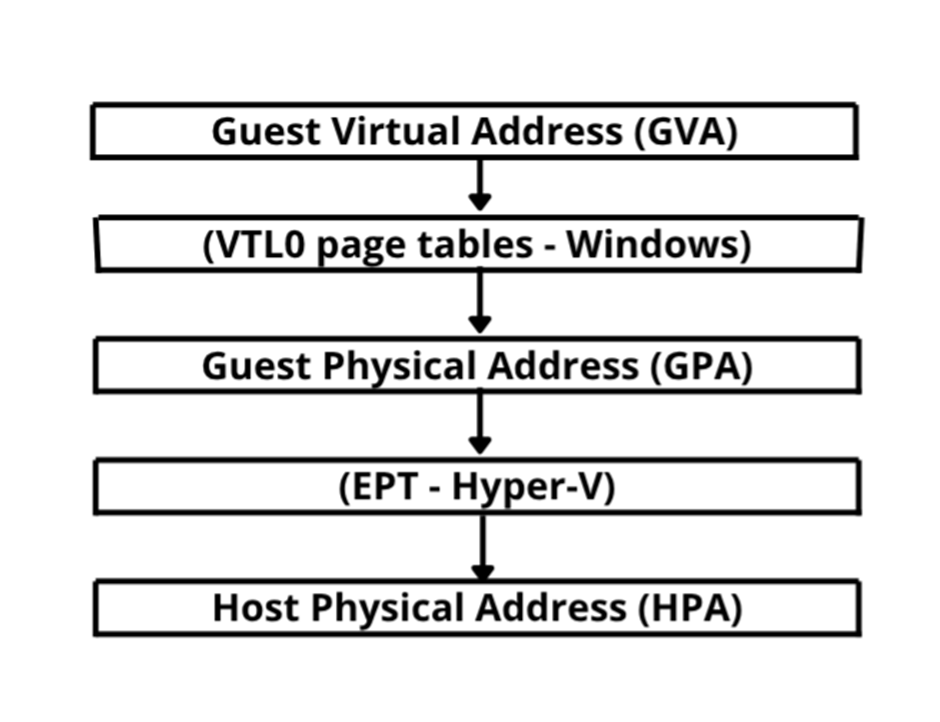
Hardware Layer: This is the place where Intel VT-x or AMD-V lives. These are hardware virtualization extensions built into the CPU itself. With enabled virtualization in BIOS, you’re giving the CPU permission to create isolated execution environments. The main difference between software virtualization is that the CPU can now physically partition itself to create isolation. The CPU itself can maintain multiple sets of page tables, multiple sets of processor states, and can switch between them at hardware speed.
The Extended Page Tables (EPT) or Nested Page Tables (NPT) are particularly important. These provide second layer of memory address translation that sits below the operating system’s page tables. The OS can say “this page is writable”, but EPT can respond with “no, it’s not” and the OS has no way to override that decision.
Hypervisor Layer (Hyper-V): Microsoft’s Hyper-V hypervisor runs in what’s called VMX root mode. This layer is more privileged than the kernel. The hypervisor owns the hardware – it decides what the kernel can and cannot do. When HVCI is enabled, Hyper-V isn’t just here to run virtual machines; it’s there to control and protect the kernel itself. Every time the kernel tries to do something with privileges (modify page tables, execute certain instructions, access certain memory), the CPU checks with hypervisor first. If hypervisor says no, the operation fails. The hypervisor’s response is a word of law because it’s enforced by the CPU hardware itself.
The hypervisor maintains the EPT structures that control memory permissions. When we talk about code being “read-only” under HVCI, we mean read-only in the EPT. Even if we force the regular Page Table Entry (PTE) to be writable, EPT can still refuse the write attempt.
The CPU performs address translation in 2 stages: first through guest’s page tables (Windows’ page tables), then through EPT (hypervisor’s page table). Translation must succeed in both cases for a write to work. If either responds with “no write access”, then there’s no write access, period. Depending on the functions that we use to attempt write, there can be only 2 outcomes – access denied or bluescreen.
VTL1 (Secure Kernel): This is where the magic happens. VTL1 runs securekernel.exe, which is essentially a minimal operating system kernel dedicated entirely to security. It’s small, only a few megabytes in size, focused on one task: enforce code integrity policies. The Code Integrity (ci.dll) modules live here, along with Secure Kernel Code Integrity (skci.dll). These components validate every driver before it loads, verify that kernel code hasn’t been modified, and enforce policies about what can and cannot be executed.
VTL1 is isolated from VTL0 at the hypervisor level. Even though both seem to run at the same level from the CPU perspective, they’re completely separate virtual machines from the hypervisor’s perspective. VTL1 is the more trusted level and can access VTL0’s memory (one-way access). However, VTL0 cannot read VTL1’s memory. VTL0 cannot debug VTL1. VTL0 cannot even detect what VTL1 is doing. The only way VTL0 can communicate back to VTL1 is through carefully controlled hypercalls, essentially asking the hypervisor to deliver a carefully checked message to VTL1. And still, VTL1 decides whether to respond or not.
VTL0 (Normal Kernel): This is where the Windows you know resides. The entire Windows kernel (ntoskrnl.exe), the Hardware Abstraction Layer (hal.dll), and all your drivers run here. While these components are aware they’re running under virtualization, the hypervisor’s presence is largely transparent to normal operations, allowing existing Windows software to function without modification.
In short, VTL0 is like a wild, completely untrusted animal living in a cage. VTL0 has only strict and regulated access to certain pages. It can execute kernel code, but it cannot modify what it’s executing. Any attempt to write to a code page triggers an EPT violation, which causes a VM-exit to the hypervisor, which forwards the violation to VTL1, which immediately bugchecks the system. The sequence is simple and unforgiving: write attempt to code → EPT violation → VM-exit → bugcheck.

BUT data sections of all processes have EPT RW- permissions. HVCI does not perform integrity checks on data sections, so in the right place, attackers could override e.g. function/variable pointers in the data section, which opens up some possibilities for HVCI-safe hooks.
1.2 Extended Page Tables (EPT) – The Enforcement Mechanism
EPT is a place where theory meets reality. This is the actual enforcement mechanism that makes HVCI work. Understanding EPT is critical because this is why every attempt to modify kernel code fails.
In a traditional, non-virtualized system, address translation works like this:
- Program gives the CPU a VA (Virtual Address)
- CPU looks it up in page tables and returns physical address.
- This page table contains permission bits
- Is it Readable?
- Is it Writable?
- Is it Executable?
- If the permissions bits are misaligned with the operation that you are trying to perform, you get a page fault.
But with the virtualization, there’s a problem: the page tables are controlled by the VTL0, which is untrusted. A compromised kernel could just modify its own page tables to give itself permission to write to code pages. To prevent this, the hypervisor introduces a second layer of translation: Extended Page Tables.
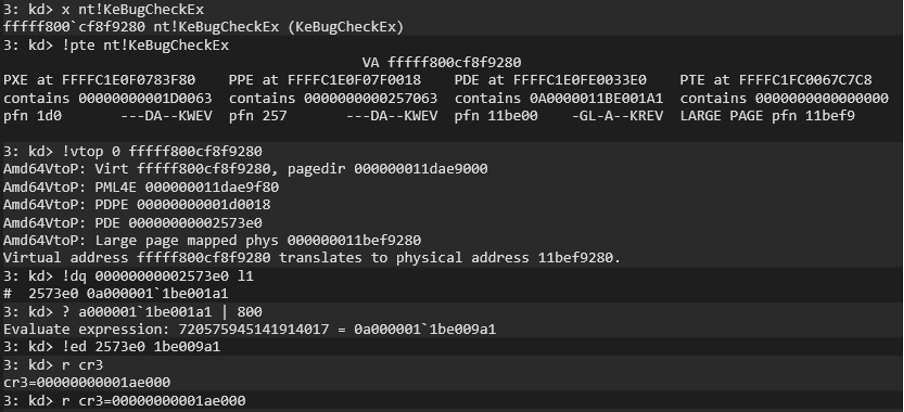
How it works in practice: Windows tracks active processes through doubly-linked lists embedded in the EPROCESS structure. When a process terminates, the kernel must unlink it from these lists – a task handled by PspProcessDelete, an internal kernel function responsible for cleaning up process objects and removing them from the ActiveProcessLinks chain. This function performs critical integrity checks on the LIST_ENTRY structures to ensure they haven’t been corrupted or tampered with. If your driver has manipulated these links to hide a process, PspProcessDelete will detect the inconsistency and trigger a 0x139 bugcheck during termination.
Understanding how Windows protects code like PspProcessDelete is crucial. When your driver attempts to access memory at address 0xFFFFF80274EE1310 (let’s say that’s where PspProcessDelete is placed), the CPU first translates that virtual address through Windows’ page tables to get a Guest Physical Address (GPA). Let’s say that translates to 0x274EE1000. But that’s not all. The CPU then takes that GPA and translates it again through EPT to get the actual host physical address.
So even if VTL0 marks the page as writable in its page tables, EPT is still able to force the read-only policy.
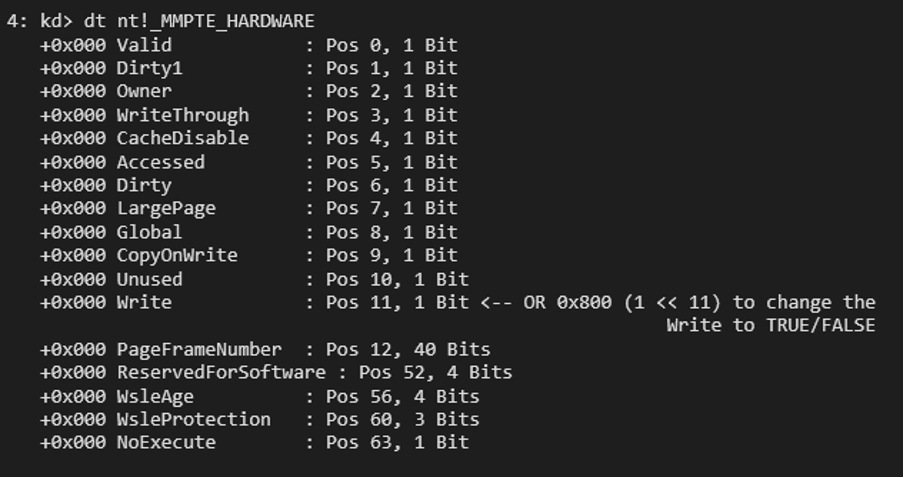
VTL0 Page Tables (Windows’ Perspective)
Windows sees its page tables and believes that it has full control. For kernel code pages, Windows typically sets them up like this:
For kernel code pages, Windows sets:
- Valid = 1 (page present in memory)
- Write = 0 (page is read-only… supposedly)
- NoExecute = 0 (execute is allowed)
But here’s the thing: Windows can change these bits. A driver with sufficient privilege can modify the page tables. That’s what traditional hooking relied on – changing page permission to writable, write the hook, then mark them read-only again. This worked for decades, but not anymore.
EPT (Hypervisor’s Perspective):
The hypervisor maintains its own page table for each VM. These EPT structures have a similar format but with a critical difference: the guest cannot modify them.

For kernel code pages with HVCI enabled, the hypervisor configures EPT like this:

This structure is completely out of access for VTL0. Even if you could somehow access that memory (you can’t), any attempt to modify it would be caught by the hypervisor’s own memory protection mechanism.
This was the goal of HVCI: create an enforcement mechanism completely out of reach with only trusted binaries.
The Permission Check Process
When you driver executes an instruction like “mov byte ptr [0xFFFFF80274EE1310], 0xCC” (trying to write an INT3 breakpoint), here’s what exactly happens inside the CPU:
Stage 1: Guest Page Table Walk (VTL0)
- CPU Checks: Is virtual address 0xFFFFF80274EE1310 valid?
- Walk page tables: PML4 -> PDPT -> PD -> PT
- Find PTE for this address
- Check PTE permissions:
- Check if Valid bit is 1
- Write = 0, but… force PTE write to 1
- OR Check CR0.WP (Write Protect bit)
- If CR0.WP = 0 (disabled), IGNORE Write bit and allow
- Result: Windows page tables allow the write
- Get GPA: 0x274EE1000
At this point, traditional Windows security would let the write proceed. The page tables responded with okay (because of disabled CR0.WP or PTE force-set to write), so the write would succeed. This is how traditional hooking worked. But…
Stage 2: EPT Walk (VTL1)
- Take GPA from stage 1: 0x274EE1000
- Look up in EPT: EPT_PML 4-> EPT_PDPT -> EPT_PD -> EPT_PT
- Find EPT_PTE for GPA 0x274EE1000
- Check EPT_PTE permissions:
- Check if Read bit is 1
- Write bit is 1, so violation happens
- Check if execute bit is 1
- Permission denied by EPT
- Generate VM-exit: EPT_VIOLATION
The CPU hardware itself stopped the operation. It doesn’t matter what Windows said. It doesn’t matter that there was disabled CR0.WP. It doesn’t matter that we have set VTL0 PTE to write. EPT said no, and that’s all, nothing else matters.
Stage 3: VM-Exit Handler (VTL1)
- CPU saves current state
- Switch from VTL0 to VTL1
- Hypervisor VM-exit:
- Exit: reason: EPT_VIOLATION
- GPA that caused violation: 0x274EE1000
- Operation type: WRITE
- GVA: 0xFFFFF80274EE1310
- Check: Is this GPA in code region?
- Response: TRUE – kernel code
- Code integrity violation
- Forward to VTL1 for handling
Stage 4: VTL1 Response
- VTL1 receives notification “Attempted to write to code pages”
- VTL1 calls KeBugCheckEx
- System crashes
This entire sequence in hypervisor code that VTL0 cannot access and modify.
Part 2: Process Notification Callbacks as an Interception Vector
After multiple failures attempting to hook kernel functions and manipulate process lists directly – all of which either triggered immediate bugchecks or were blocked by HVCI’s memory protections – I returned to the most boring solution imaginable: documented Microsoft APIs. The original goal remained unchanged: hide processes from user-mode enumeration by removing them from the kernel’s process tracking structures. No clever tricks, no hardware wizardry, no architectural exploitation – just a simple callback that Windows officially provides for monitoring process lifecycle events: PsSetCreateProcessNotifyRoutineEx.
And it worked perfectly.
But before we dive into the solution, let’s understand the problem we’re actually solving
2.1 What Happens When You Hide a Process
Let’s say you want to hide a process from programs like Task Manager or Process Hacker. The classic rootkit technique is to unlink the process from the system’s process list. Every EPROCESS structure contains an ActiveProcessLinks field, a doubly-linked LIST_ENTRY that chains all processes together. To hide a process, you simply unlink it.
Process 1 <-> Process 2 <-> Process 3
You manipulate the Flink (Forward link), and Blink (Backwards link) pointer so Process 1 points directly to Process 3, and Process 3 points back at Process 1. Process 2 is now “hidden”. It is still running, but invisible to any code that walks the ActiveProcessLinks list.
But there is an issue: when the process terminates, integrity checks are performed. If tampered links are detected, the system crashes with 0x139 KERNEL_SECURITY_CHECK_FAILURE exception.

I started analyzing each function and each step that leads to the bluescreen. One of these functions stands out – PspProcessDelete. On the image above we can see that directly after the PspProcessDelete, KiSecurityCheckFailure is called as the first function on the PatchGuard crash route.
So, let’s look at the nt!PspProcessDelete+0x95:

There is an interrupt instruction “int 29h”. In x86/x64 architecture, interrupts are mechanisms that allow the CPU to temporarily pause normal execution and jump to special handler routines. These handlers are registered in the Interrupt Descriptor Table (IDT) – a system table that maps each interrupt number (0x00 through 0xFF) to its corresponding handler function address. When the CPU executes an interrupt instruction like “int 29h”, it looks up entry 0x29 in the IDT and transfers control to whatever handler is registered there.
Int 29h is particularly interesting because it’s a Fast Fail interrupt used by Windows for critical security violations. When the kernel detects tampering with protected structures (like our manipulated LIST_ENTRY chains), it triggers int 29h, which immediately invokes the bugcheck mechanism – resulting in that familiar blue screen.
But wait, we can’t hook the IDT because of HVCI, right? Traditionally, rootkits would modify IDT entries to redirect interrupt handlers, but HVCI marks the IDT as read-only through EPT, making such modifications impossible from VTL0. When we take a closer look at the PspProcessDelete function in IDA…
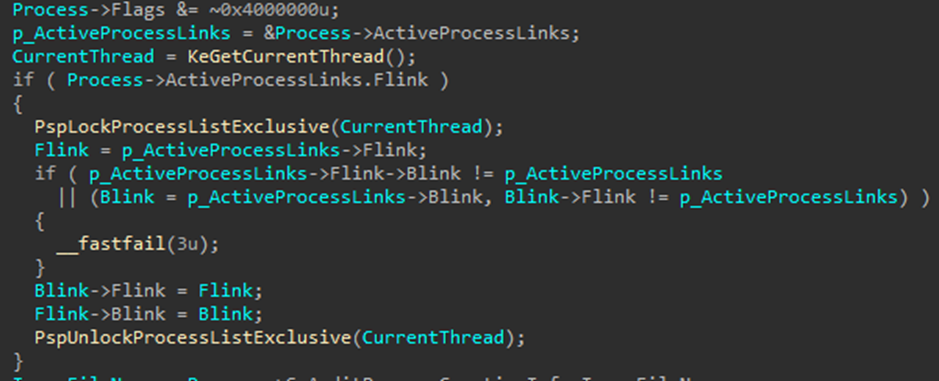
We can see that before the interrupt there are some checks done. Particularly this check:
Which in pseudocode looks like this:
What if we could somehow change the execution flow to skip that entire if-block?
Before attempting any code writing, I decided to find out what exactly the RCX register stores. PspProcessDelete has only one parameter, so it must receive some sort of a structure that contains process information, right? The first thing that came to mind my was an EPROCESS structure. To verify that, I quickly went to WinDbg to make sure:
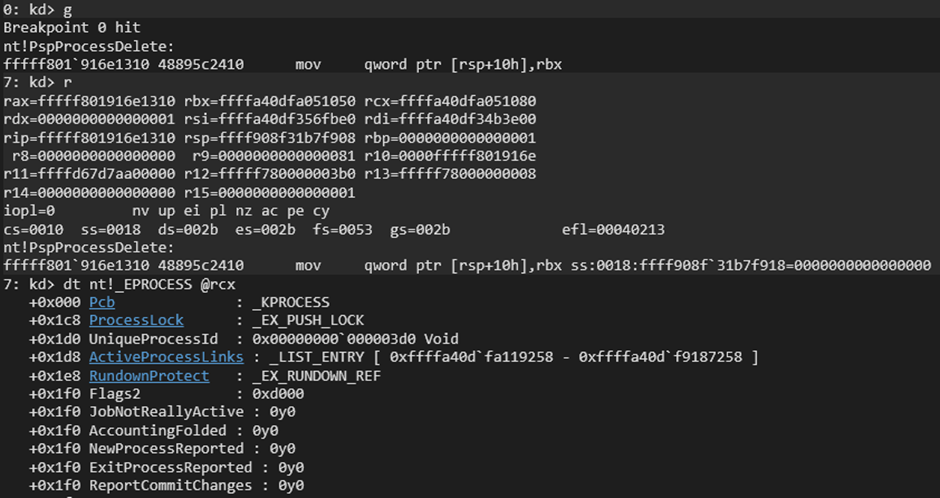
Bingo! My guess was right, the “BugCheckParameter2” parameter in IDA is of an EPROCESS structure type. After replacing the ULONG_PTR with _EPROCESS the entire function became crystal clear.
When our process is hidden and we decide to terminate it, one of the first things that are done during the process termination are checks on the LIST_ENTRYs to determine if the entries are tampered with.
The easiest thing that could be done is just overriding the “jz” with “jmp” instruction, but because of HVCI we can’t do that. Additionally, there aren’t any data section pointers called, so we just can’t override them to get current context. So, what are the possibilities?
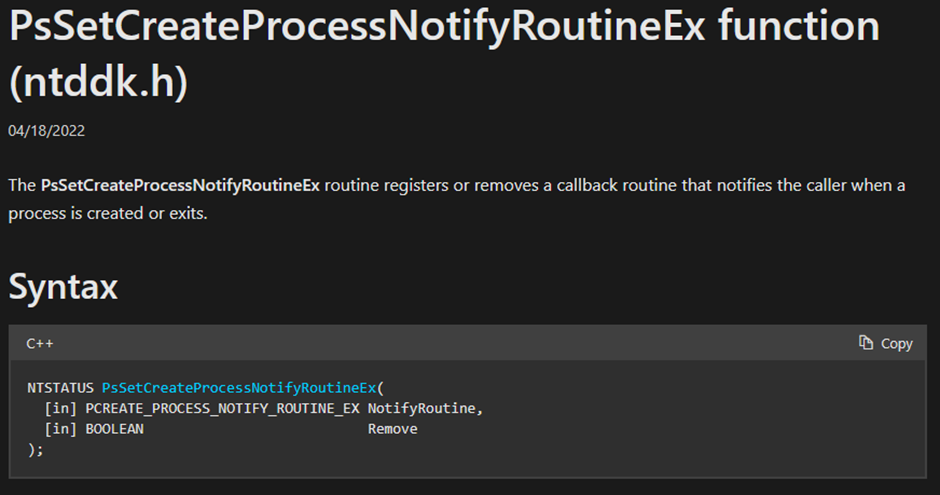
The solution is the most boring and common PsSetCreateProcessNotifyRoutineEx. This routine registration function allows us to create a callback on process creation and/or termination.
Our callback function would receive 3 parameters after registration.
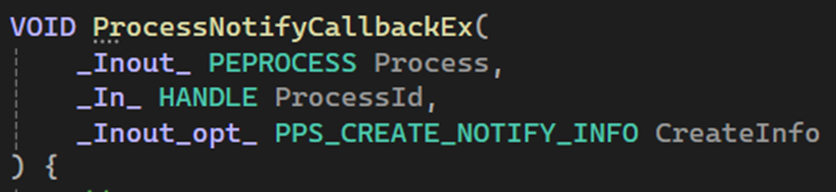
Just before the function call to PspProcessDelete, we receive the same EPROCESS structure in our process termination callback. What if we just fixed the LIST_ENTRY structures right before PspProcessDelete’s validation checks execute?
Here’s what “fixing” means in this scenario: when a process is hidden, we’ve unlinked it from the ActiveProcessLinks doubly-linked list by manipulating its Flink (forward link) and Blink (backward link) pointers. This creates an inconsistency, the LIST_ENTRY no longer points to valid neighboring entries in the chain. When PspProcessDelete runs its integrity checks, it detects this corruption and triggers a bugcheck.
Our callback executes at the perfect moment. After we receive notification that a process is terminating, but before PspProcessDelete performs its validation. At this point, we can:
- Detect the terminating process by checking if CreateInfo is NULL in our callback
- Extract the ActiveProcessLinks from the EPROCESS structure
- Verify the LIST_ENTRY has been corrupted (check if Flink/Blink point to invalid or mismatched addresses)
- Repair the links by restoring valid Flink and Blink pointers that connect back to legitimate entries in the process list
- Let PspProcessDelete continue with its validation- it now sees a properly formed, consistent LIST_ENTRY chain
By the time PspProcessDelete’s validation code executes, the LIST_ENTRY structure is completely aligned and valid. The integrity checks pass because there’s nothing to detect as we’ve restored the proper doubly-linked list structure just microseconds before the system examines it. The process was hidden during its lifetime, but at the moment of termination, we temporarily “unhide” it by fixing the data structures, allowing clean termination without triggering security checks.
2.2 Retrieving Data
First thing we have got to do is to extract the ActiveProcessLinks of the process. We will do that for every process that is terminated. We can verify if the process is terminating by checking if CreateInfo is null. In my example, I also extract flags just for the test’s purposes.
The next step is to retrieve LIST_ENTRY structure from the ActiveProcessLinks


Firstly, before we apply bypass, we must verify if the terminating process has corrupted LIST_ENTRY.
When corruption is detected, we perform a targeted repair to restore LIST_ENTRY consistency. The fix addresses the specific validation that PspProcessDelete performs:
What PspProcessDelete Checks: The validation verifies bidirectional consistency in the doubly-linked list:
Flink->Blinkmust equal our list entryBlink->Flinkmust equal our list entry
If either check fails, the system triggers a Fast Fail interrupt (int 0x29) leading to a 0x139 bugcheck.
The Repair: Our code (shown in the second screenshot) restores these pointers by making the neighboring entries reference our LIST_ENTRY again:
*FlinkBlink = OurListEntry– Repairs the forward link’s backward pointer*BlinkFlink = OurListEntry– Repairs the backward link’s forward pointer
After this repair, both validation checks pass. The LIST_ENTRY structure appears properly formed and consistent, allowing PspProcessDelete to continue safely without detecting any corruption.

2.3 Results

After manually triggered exception, our driver detects process with corrupted LIST_ENTRY structure and fixes it. This happens just before PspProcessDelete, successfully bypassing integrity check.
2.4 Summary
The problem: Hiding processes by unlinking LIST_ENTRY structures works until termination, when PspProcessDelete’s integrity checks trigger a bugcheck.
The solution: Use PsSetCreateProcessNotifyRoutineEx to register a callback that repairs the corrupted LIST_ENTRY structures right before PspProcessDelete runs its checks. By the time validation occurs, the structures appear legitimate.
The constraint: This approach requires a signed kernel driver. On production systems without test signing enabled, you cannot load arbitrary kernel code – Windows enforces driver signature verification through Code Integrity policies. This means any practical implementation demands either:
- A legitimately signed driver from a trusted vendor
- A compromised/stolen code signing certificate
- Exploitation of a vulnerable signed driver already present on the system
HVCI doesn’t prevent this technique because we’re not modifying code pages – we’re manipulating writable data structures using officially documented callbacks. But the barrier to entry is high: you need kernel code execution privileges, which on modern Windows means you need a valid signature.
Part 3: Other Approaches
HVCI’s protection is enforced at the hypervisor and hardware level, making it effectively unbreakable from VTL0. The Extended Page Tables (EPT) are controlled by Hyper-V, which operates below the Windows kernel.
If a vulnerability exists in the HVCI security architecture components, we could attempt to exploit these:
- Boot sector exploits – Compromising the boot process before Hyper-V loads
- CPU vulnerabilities – Hardware-level bugs in Intel VT-x/AMD-V implementation (e.g. Spectre, Meltdown variants)
- Hypervisor exploits – Finding and exploiting bugs in Hyper-V itself to gain VMX root access/controls
- VTL1 – Compromising the Secure Kernel through memory corruption or logic bugs
However, all of these require exploitation of potential vulnerabilities.
3.1 Paths Not Requiring Exploitation
Since HVCI protects code pages, data pages remain writable. This opens a narrow window:
Hook Function Pointers in Data Sections
Some kernel operations dispatch through function pointer tables stored in writable memory. This could be abused by replacing the pointer and redirecting the execution flow.
This is theoretically viable but extremely difficult in practice. PatchGuard does not monitor function pointers in kernel data sections or the heap – its protection focuses on well-known structures like SSDT, IDT, and GDT, as well as code sections in critical modules. Function pointers stored in writable kernel pool memory remain unmonitored by integrity checkers, creating a potential attack surface.
However, the practical challenges are significant:
1. Finding useful function pointer tables in writable memory requires extensive reverse engineering and pattern scanning.
2. Most kernel dispatch mechanisms don’t rely on simple function pointer arrays in data sections—they use more complex structures or inline calls.
3. Even if you locate such pointers, you need them to point to valid signed code to avoid other protections.
4. The technique still requires a signed driver to execute the modification code in the first place.
While PatchGuard won’t detect the pointer modification itself, finding function pointers that would actually change execution flow in a useful way is exceptionally rare and difficult.
Modify vtables
Object-oriented kernel components use virtual function tables in data sections.
Note: This is essentially the same approach as hooking function pointers above – vtables are just structured arrays of function pointers. The same PatchGuard and CFG protections apply, making this equally non-viable.
Intercept Callback Registrations
Replace callback function pointers when drivers register them through APIs like PsSetCreateProcessNotifyRoutineEx, IoRegisterFsRegistrationChange, or CmRegisterCallback.
This is partially viable but limited. Callback arrays (like the PspCreateProcessNotifyRoutine array) are stored in writable kernel data sections and are not directly protected by PatchGuard checksums. You could theoretically modify these arrays to inject your own callbacks, replace existing ones or delete them.
However, there are significant obstacles:
1. Finding the unexported callback arrays requires pattern scanning or symbol resolution.
2. On systems with HVCI enabled, kernel-mode CFG will validate that callbacks point to valid signed code.
3. Some callback mechanisms like ObRegisterCallbacks involve _OBJECT_TYPE structures that ARE monitored by PatchGuard and will trigger bugchecks if modified.
4. The technique still requires a signed driver to execute the modification code in the first place.
Context Manipulation
Modifying CPU registers at runtime. The most challenging part is to find a reliable way to hijack thread context to retrieve and modify the register values during runtime to force change execution flow.
This is theoretically viable but extremely fragile. Techniques like APC injection or SetThreadContext allow modification of the KTRAP_FRAME structure containing register values (particularly RIP/instruction pointer) when threads transition contexts. However, this approach faces severe practical limitations: modern Windows with Intel CET or AMD Shadow Stacks validates context modifications to prevent control-flow hijacking, timing requirements are extremely tight, and any mistake results in immediate system instability or crashes.
3.2 Context Manipulation During Thread Transitions
Among the non-exploitation paths explored, context manipulation stands out as the most sophisticated, and most fragile, approach to achieving our goal of hiding processes without triggering HVCI violations. The core idea is deceptively simple: if we can’t modify the code that validates LIST_ENTRY structures, perhaps we can redirect execution around those validation routines entirely. By capturing and manipulating CPU register state during legitimate thread transitions, we could theoretically skip over PatchGuard checks or redirect validation logic to benign code paths that don’t examine our tampered structures.
The Concept:
Windows constantly saves and restores thread context during normal operations – syscall entries, APC deliveries, context switches between threads. At these moments, the entire CPU register state (RIP, RSP, RCX, RDX, and others) is captured into memory structures. If we can intercept these transitions, we gain access to the saved context before it’s restored. From there, the attack becomes surgical: modify the RIP (instruction pointer) to skip validation code or redirect to a trampoline function, adjust stack pointers if necessary, and let execution resume. The thread continues as if nothing happened, but we’ve effectively hijacked its control flow without touching a single byte of protected code.
Implementation Approaches:
Several techniques could theoretically enable this manipulation. APC injection with context modification involves queueing an Asynchronous Procedure Call to a target thread, then tampering with the APC’s delivery context before the kernel dispatches it, redirecting where the APC “returns” after completion.
Context swap hooking targets the moment when KeSwapContext (or similar scheduler functions) saves one thread’s state and loads another’s, giving us a window to modify the saved register values.
Breakpoint manipulation requires registering as a kernel debugger and placing INT3 breakpoints on target functions; when hit, we handle the debug interrupt, modify the trap frame, and resume execution elsewhere. Without proper debugger registration, these breakpoints trigger unhandled exceptions and system faults.
Finally, trap frame manipulation during syscalls intercepts the moment when user-mode code transitions into kernel mode, the trap frame stored on the kernel stack contains all user-mode registers, and modifying it before the syscall handler executes can redirect control flow immediately upon return.
Why This is a Theoretical Path:
This approach has several appealing properties. It operates entirely on CPU registers – the only execution state not protected by EPT’s memory access controls. It doesn’t modify code pages, sidestepping HVCI’s primary enforcement mechanism. By redirecting execution to existing code gadgets, it can leverage ROP-like techniques to compose complex behaviors from legitimate signed code. Most importantly, it can intercept any function simply by hijacking control flow before the target executes.
The Challenge:
Despite its theoretical elegance, context manipulation is extraordinarily difficult in practice. Timing is critical: capturing context too early or too late means operating on stale or incomplete state. The techniques are extremely fragile – minor kernel updates, changes to scheduling behavior, or variations in CPU microarchitecture can break them entirely. The complexity is staggering, what might have been a simple “trick” in older Windows versions now requires intricate chains of precisely timed operations across multiple subsystems.
Perhaps most limiting, many PatchGuard validation functions are VOID (no-return) functions that invoke bugchecks directly rather than returning error codes. Simply modifying a register to change a jump destination won’t help if the function never returns. You must redirect execution before the validation logic runs, requiring perfect knowledge of call chains and execution paths.
Final Thoughts
The era of clever kernel tricks is over. HVCI didn’t just raise the bar – it fundamentally changed the game by moving enforcement to a layer that kernel code simply cannot reach. Every attempt to use traditional interception techniques ends the same way: blocked by hardware or instant bugcheck.
What this research demonstrates isn’t a weakness in HVCI, it’s a testament to how well it works. The only viable approach we found doesn’t bypass HVCI at all. Instead, it operates entirely within the constraints HVCI imposes by manipulating writable data structures and timing operations precisely to avoid detection mechanisms.
The irony is that after months of complex experimentation, the working solution is almost boring in its simplicity. No exploitation required, no hardware vulnerabilities leveraged, no hypervisor bugs discovered. Just understanding what traditional PatchGuard checks, when it checks, and fixing the data right before those checks run.
However, there’s a critical caveat: this technique addresses PatchGuard’s validation mechanisms, but Secure Kernel PatchGuard (SKPG) remains largely unexplored territory. SKPG operates from VTL1 with privileged hypervisor access, monitoring the normal kernel from a security context that VTL0 drivers cannot observe or interfere with. Its checks may be more comprehensive, run at different intervals, or validate structures we haven’t accounted for. The timing-based repair approach that works against traditional PatchGuard may be insufficient against SKPG’s monitoring capabilities.
This narrow success doesn’t mean HVCI is broken. It means that:
- Code protection works really well. We never touched a single code page
- Data manipulation is the only viable path. And even that requires perfect timing and deep understanding
- The attack surface is tiny. This works for one specific detection mechanism (traditional PatchGuard’s LIST_ENTRY validation) in one specific function
- SKPG remains an unknown. We’ve bypassed one layer of protection, but the more privileged watchdog may detect what we’re doing
For researchers, this work shows that understanding the system deeply is more valuable than looking for magic bullets. Modern Windows security isn’t something you “bypass” with a clever trick – it’s something you have to understand completely, find the exact boundaries of, and work carefully within those constraints.
The cat-and-mouse game isn’t dead – it’s just moved to a much smaller playing field, where the mice have to be incredibly precise, and the cat has home-field advantage. And in this case, there might be a second, more vigilant cat watching from the hypervisor level that we haven’t fully accounted for yet.
To be continued… 😊

References
- Saar Amar – “Subverting VBS” (2018)
- Joe Bialek – “Analysis of Windows 10 VBS Attack Surface” (2017)
- https://rayanfam.com/topics/hypervisor-from-scratch-part-4
- https://learn.microsoft.com/en-us/windows-hardware/design/device-experiences/hypervisor-protected-code-integrity
- https://connormcgarr.github.io/hvci